– To know more about Epson WF-C579, WF-C529 Operating Principles, click here
– To know more about Installation on Epson WF-C579, WF-C529, click here
Installation
- Step 1. Place the optional cassette to the point where installing the printer main unit.
- Step 2. Place the printer on the optional cassette.

- Step 3. Paste the cassette number label

- Step 4. Attach the Stacker.

- # Connect the power cable.

— Epson WF-C579, WF-C529 Inksystem mechanism, click here
— Epson WF-C579, WF-C529 Inksystem mechanism details, click here
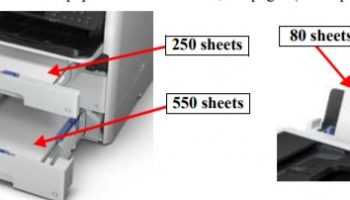
Attaching the Optional Paper Cassette Unit
When attaching the Optional Paper Cassette Unit (C3) to the Optional Paper Cassette Unit (C2), it is necessary to remove the Rear Lower Cover Assy from the Optional Paper Cassette Unit (C2). Remove the Rear Lower Cover Assy by following the steps given below.
- Step 1. Pull out the Paper Cassette 2, then remove it from the Optional Paper Cassette Unit (C2).

- Step 2. Remove the Rear Lower Cover Assy in the direction of the arrow by picking up the tab on the Rear Lower Cover Assy.

- Step 3. Attach the Optional Paper Cassette Unit (C2) to the Optional Paper Cassette Unit (C3).

CAUTION: When placing the printer on the Optional Paper Cassette Unit, there is a risk of damaging the connector of the Optional Paper Cassette Unit, so be sure to lower it down vertical while aligning the four corners of the printer and the Optional Paper Cassette Unit.

–Epson WF-C579, WF-C529 Paper Loading, Paper Feed mechanism, click here
–Epson WF-C579, WF-C529 Paper Loading, Paper Feed mechanism details, click here